|
|
SignServer v.3 Installation Guide |
Sidnr / Page no |
|
|
|
|||
|
Uppgjort / Author |
Sekretess / Confidentiality |
||
|
Philip Vendil
|
UNRESTRICTED |
||
|
Godkänd / Authorized |
Datum Date |
Version |
|
|
|
2008-01-06
|
3.0 |
|
SignServer
3.0
Installation
Guide
Written By
Philip
Vendil, philip@primekey.se
+46709885814
2008-01-06
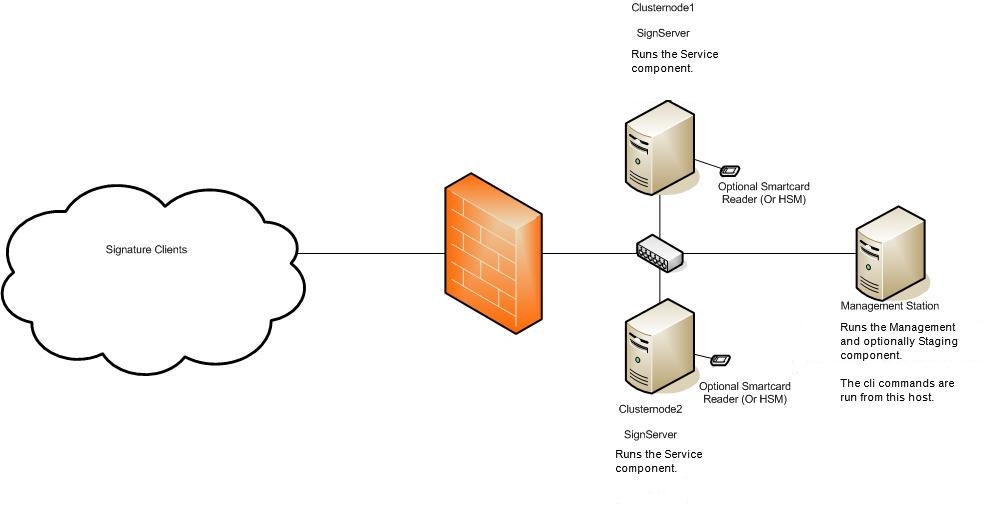
This document describes step by step instructions on how to install SignServer on a cluster using Cent OS 4.4 as a platform, but should be quite easy to adjust to other platforms or to run as a single node.
A cluster consist of of three different components, one management component, one staging component, and service components (regular nodes in the cluster).
The management component contains a small mysql cluster daemon, managing the mysql. This process doesn't require much performance but cannot be run on a service component running a mysql cluster data node.
The staging component is where the building, deploying and daily operation of the cluster is performed. It requires the installation of the SignServer code. The staging component can be run on either on the same server as the management component or on on of the service components.
A service component runs a Mysql Cluster data node and a JBoss instance and performs the actual service.
In a cluster of two service components is there a requirements of three servers, but the management server don't need any performance and doesn't need to be dedicated for its task.
The installation instructions have been marked on which of the three components it belongs to by a (MGMT) for the management component, (STAGE) for the stage component and (SERVICE) for the service component.
|
Version |
Date |
Name |
Comment |
|---|---|---|---|
|
1.0 |
2007-05-20 |
Philip Vendil |
Initial version of the document. |
|
3.0 |
2007-01-06 |
Philip Vendil |
Updated the document for 3.0 |
|
|
|
|
|
Table of Contents
1 Introduction/Scope 2
2 Document History 3
3 Required Software 4
4 Prerequisites 4
5 Installation Instructions 4
5.1 Installation of Java environment (STAGE), (SERVICE) 4
5.2 Installation of Ant (java build tool, same as make in c) (STAGE) 5
5.3 Installation of Jboss (SERVICE) 5
5.3.1 Install Mysql JDBC drivers 5
5.3.2 Remove debugging log 5
5.4 Set the environment (STAGE), (SERVICE) 6
5.5 Set up Mysql Cluster (SERVICE), (MGMT) 6
5.5.1 Set up the management node (MGMT) 6
5.5.2 Set up a service node (SERVICE) 7
5.5.3 Testing that the Mysql Cluster is set up properly 8
5.6 Installation SignServer (STAGE) 9
5.6.1 preinstall SignServer (STAGE) 9
5.6.2 Configuration of the SignServer 10
5.7 Test the installation 11
5.7.1 The automated test script 11
5.7.2 The test client 11
6 More Information 11
MySQL-server-5.0.27-0.i386.rpm (SERVICE)
MySQL-Max-5.0.27-0.i386.rpm (SERVICE)
MySQL-client-5.0.27-0.i386.rpm (SERVICE)(MGMT)
MySQL-ndb-management-5.0.27-0.glibc23.i386.rpm (MGMT)
MySQL-ndb-storage-5.0.27-0.glibc23.i386.rpm (SERVICE)
MySQL-ndb-tools-5.0.27-0.glibc23.i386.rpm (MGMT)
perl-HTML-Template-2.7-2.noarch.rpm (MGMT)
mysql-connector-java-3.1.10.tar.gz (SERVICE)
jdk-6-linux-i586.bin (SERVICE)
jce_policy-6.zip (SERVICE)
apache-ant-1.7.0-bin.tar.gz (STAGE)
Jboss-4.2.2-GA.zip (SERVICE)
signserver_2_<version>.zip (STAGE)
If you are going to set-up the service with HTTPS you also need the following:
And the files:
1 JKS key store, used as server authentication for HTTPS, in this manual it is called tomcat.jks, Important, since the jks will be used in a cluster it must contain all the IP addresses in multiple 'IP Address' Subject Alternative Name fields. (SERVICE)
1 CA certificate on the CA issuing the client certificate, in DER format used for setup of the client authentication. (SERVICE)
These instructions prerequisite a standard CentOS 4.4 installation.
First copy all of the software packages to a location on the server. This location will
in the following instructions be called <soft-dir>
cp <soft-dir>/jdk-6-linux-i586.bin /opt/
cd /opt
chmod +x jdk-6-linux-i586.bin
./jdk-6-linux-i586.bin (and use all default settings)
ln -s jdk1.6.0 java
rm jdk-6-linux-i586.bin
The install the high encryption pack.
cp <soft-dir>/jce_policy-6.zip /opt
unzip jce_policy-6.zip
sudo cp jce/*.jar java/jre/lib/security/
rm -rf jce
rm jce_policy-6.zip
cp <soft-dir>/apache-ant-1.7.0-bin.tar.gz /opt
tar zxf apache-ant-1.7.0-bin.tar.gz
ln -s apache-ant-1.7.0 ant
rm apache-ant-1.7.0-bin.tar.gz
sudo adduser jboss
Set an temporary password
sudo passwd -l jboss
Install jboss in user jboss home directory
cp <softwaredir>/jboss-4.2.2-GA.zip /opt
cd /opt
unzip jboss-4.2.2-GA.zip
ln -s jboss-4.2.2-GA jboss
mkdir jboss/server/default/log
mkdir jboss/server/default/tmp
mkdir jboss/server/default/work
mkdir jboss/server/default/data
cd /opt/jboss/server/default/deploy
rm -rf management
rm -rf jmx-console.war
rm -rf jbossws.sar (JBOSS WebService Stack conflicts with SignServer JaxWS Stack).
cd jboss-web.deployer (jbossweb-tomcat55.sar for jboss-4.0.x)
rm -rf ROOT.war
cd /opt/jboss/server
chown -R jboss.jboss *
cp <softwaredir>/mysql-connector-java-3.1.10.tar.gz /opt
cd /opt
tar zxf mysql-connector-java-3.1.10.tar.gz
rm mysql-connector-java-3.1.10.tar.gz
cp /opt/mysql-connector-java-3.1.10/mysql-connector-java-3.1.10-bin.jar /opt/jboss/server/default/lib
Remove debugging log by editing
'/opt/jboss/server/default/conf/log4j.xml'
On line 28 add the following line
<param name=´´Threshold´´ value=´´INFO´´/>
Edit the file /etc/profile
Add the following to the end:
On the staging component:
export PATH=$PATH:/opt/java/bin:/opt/ant/bin
export ANT_HOME=/opt/ant
export JAVA_HOME=/opt/java
export JBOSS_HOME=/opt/jboss
export SIGNSERVER_HOME=/opt/signserver
On a service component:
export PATH=$PATH:/opt/java/bin
export JAVA_HOME=/opt/java
export JBOSS_HOME=/opt/jboss
export JBOSS_HOST=<external IP> (Tells Jboss which interface it should bind to jboss 4.2.x + only).
export JAVA_OPTS="-Xms512m -Xmx512m"
export SIGNSERVER_NODEID=<unique name of server> (Can be any name as long as it is unique)
If STAGE and SERVICE is run on the same service must the environment variables be merged.
Then save the file and run
. /etc/profile
and make sure the settings have been set.
rpm -Uvh <softwaredir>/perl-HTML-Template-2.7-2.noarch.rpm
rpm -Uvh <softwaredir>/MySQL-ndb-tools-5.0.27-0.glibc23.i386.rpm
rpm -Uvh <softwaredir>/MySQL-ndb-management-5.0.27-0.glibc23.i386.rpm
rpm -Uvh <softwaredir>/MySQL-client-5.0.27-0.i386.rpm
mkdir /var/lib/mysql-cluster
cp $SIGNSERVER_HOME/docs/sample-configs/config.ini.cluster /var/lib/mysql-cluster/config.ini
edit the config.ini with
vi /var/lib/mysql-cluster/config.ini
And change the IP addresses of the management node and service nodes, management node under [ndb_mgmd] and service nodes under [ndbd]
cp $SIGNSERVER_HOME/docs/sample-configs/ndb_mgmd.start /etc/init.d/ndb_mgmd
chmod u+x /etc/init.d/ndb_mgmd
cd /etc/rc3.d/
ln -s /etc/init.d/ndb_mgmd S57ndb_mgmd
ln -s /etc/init.d/ndb_mgmd K14ndb_mgmd
cd /etc/rc5.d/
ln -s /etc/init.d/ndb_mgmd S57ndb_mgmd
ln -s /etc/init.d/ndb_mgmd K14ndb_mgmd
Start up the management node with
/etc/init.d/ndb_mgmd
Then start the console with
ndb_mgm
and use the command 'show' to show the current setup.
Then it's time to set up the database on all the service nodes.
rpm -Uhv <softwaredir>/MySQL-server-5.0.27-0.i386.rpm
rpm -Uhv <softwaredir>/MySQL-ndb-storage-5.0.27-0.glibc23.i386.rpm
rpm -Uvh <softwaredir>/MySQL-client-5.0.27-0.i386.rpm
rpm -Uvh <softwaredir>/MySQL-Max-5.0.27-0.i386.rpm
cp $SIGNSERVER_HOME/docs/sample-configs/my.cnf.cluster /etc/my.cnf
Edit the file with vi /etc/my.cnf
row 47 : bind-address=<the external ip addres>
row 161 : ndb-connectstring=<IP address of the mysql cluster mgmt node>
row 164 : ndb-connectstring=<IP address of the mysql cluster mgmt node>
Start the ndbd deamon with
cd /var/lib/mysql-cluster
ndbd –initial (This must only be done once, the --initial creates the database, from thereafter start ndbd with /etc/init.d/ndbd)
cp $SIGNSERVER_HOME/docs/sample-configs/ndbd.startup /etc/init.d
chmod u+x /etc/init.d/ndbd
cd /etc/rc3.d/
ln -s /etc/init.d/ndbd S57ndbd
ln -s /etc/init.d/mysql S58mysql
ln -s /etc/init.d/ndbd K14ndbd
ln -s /etc/init.d/mysql K15mysql
cd /etc/rc5.d/
ln -s /etc/init.d/ndbd S57ndbd
ln -s /etc/init.d/mysql S58mysql
ln -s /etc/init.d/ndbd K14ndbd
ln -s /etc/init.d/mysql K15mysql
Restart mysql with
/etc/init.d/mysqld restart
Set a root mysql password with
mysqladmin password -u root <password>
Start mysql console and log in as mysql user 'root'
Create the signserver database with the command (this must be done on all the service nodes):
create database signserver;
grant all on signserver.* to signserver@localhost identified by '<somepasswd>';
grant all on signserver.* to signserver@<IP of node1> identified by '<somepasswd>';
grant all on signserver.* to signserver@<IP of node1> identified by '<somepasswd>';
grant all on signserver.* to signserver@<IP of node2> identified by '<somepasswd>';
When the ndbd deamon have been started on all the cluster, issue a new 'show' in the ndb_mgm console on the management node, it should show something like:
ndb_mgm> show
Cluster Configuration
---------------------
[ndbd(NDB)] 3 node(s)
id=2 @213.212.2.123 (Version: 5.0.27, Nodegroup: 0)
id=3 @213.212.2.124 (Version: 5.0.27, Nodegroup: 0, Master)
id=4 @213.212.2.125 (Version: 5.0.27, Nodegroup: 0)
[ndb_mgmd(MGM)] 1 node(s)
id=1 @213.212.2.120 (Version: 5.0.27)
[mysqld(API)] 3 node(s)
id=5 @213.212.2.124 (Version: 5.0.27)
id=6 @213.212.2.125 (Version: 5.0.27)
id=7 @213.212.2.123 (Version: 5.0.27)
When everything is OK. All ndbd nodes must be started before any of the mysqld daemons will connect.
Tip, if nodes have problems to connect it sometimes helps issuing the command 'PURGE STALE SESSIONS' in the ndb_mgm console.
The test that all service nodes can connect to each other by issuing on all the nodes.
mysql -h <nodeip> -D signserver -u signserver -p
Then log on to one of the mysql consoles on one of the service nodes and issue the commands:
use signserver;
create table ctest (i INT);
insert into ctest values (1);
Then log into the two other nodes mysql consoles and issue:
use signserver;
select * from ctest;
and check that the '1' have been set.
First generate a SSH key on the staging machine that will be used for the scp copying to the other SERVICE servers.
On the STAGING machine do:
su – jboss
ssh-keygen -t rsa -b 2048
Make sure the /home/jboss/.ssh directory isn't world/group readable as well as the id_rsa file.
The copy the contents of id_rsa.pub to all the other SERVICE servers to a file
called /home/jboss/.ssh/authorized_keys and make sure only the jboss user have write access to the .ssh directory and the authorized_keys
Then from the STAGING server connect to all the other (including itself, if it is used as a SERVICE component as well). And accept all the remote keys so they are in the known_hosts file.
If you are going to use HTTPS. Then configure the Java Key Store of the Staging server. (This command must be run as root) ant install (from SIGNSERVER_HOME)
What this task do is removing the old java cacert truststore located at $JAVA_HOME/jre/lib/security/cacerts and creating a new on with the specified CA certificate imported. After this, copy the 'cacerts' file to all of the Service nodes into the directory '$JAVA_HOME/jre/lib/security/' and make sure it is only writeable as root. The reason this cannot be done automatically is that the ant setup cannot write with root privileges.
cp <softwaredir>/signserver_<version>.zip /opt
cd /opt
unzip signserver_<version>.zip
ln –s signserver_<version> signserver
cd signserver
cp signserver_build.properties.sample signserver_build.properties
vi signserver_build.properties
uncomment the rows and change to:
row 20: server.java.target=1.6
row 21: client.java.target=1.6
if you aren't using https uncomment:
row 50: j2ee.web-nohttps=true
If you are using htts do the following unstead:
row 56: java.trustpassword=changeit
row 59: java.trustcert=<Path to root ca certificate>
row 62: httpsserver.password=<Password of JKS keystore>
row 66: httpsserver.keystore=<Path to JKS keystore>
Next configure the database:
row 98: database.name=mysql
row 110: datasource.mapping=mySQL
row 125: database.url=jdbc:mysql://<IP nod1>,<IP nod2>:3306/signserver
row 133: database.use.mysqlcluster=true
row 138: database.driver=com.mysql.jdbc.Driver
row 146: database.username=signserver
row 151: database.password=<somepasswd>
row 166: deploy.hostname.node1=<IP nod1>
row 167: deploy.hostname.node2=<IP nod2>
row 168: deploy.hostname.node3=<IP nod3>
row 187: deploy.ssh.appsrvhome=/opt/jboss
Then edit the file /opt/signserver/signserver_cli.properties
and change the rows:
row 10: hostname.masternode=<IP of NOD1> (Used as default nod to call for operations that becomes global.)
row 12: hostname.allnodes=<IP of NOD1>;<IP of NOD2>
After the build configuration is complete build SignServer with the command:
cd /opt/signserver
ant ant:configure (to configure and to support SSH and SCP calls)
ant
ant deploy
This section shows an example configuration of a time-stamp server. But you'll probably have to change this to fit your into your application.
For this example you need a time-stamp authority p12 file, or you can use the test key store in src/test/timestamp1.p12
First edit the qs_timestamp_configuration.properties file and set the default policy id, the path to the timestamp p12 file and its password.
Use the signserver cli to upload the
configuration file.
bin\signserver.sh
setproperies qs_timestamp_configuration.properties
Then
run
bin\signserver.sh getconfig 1
Or
you could use the signers name
bin\signserver.sh
getconfig timestampSigner
And double-check the
configuration. (Important, the properties are case
sensitive).
Finally run
bin\signserver.sh
reload 1
To
activate the configuration and you are all set.
This can only be run if the Staging component is the same server as a Service component. (since it calls the jboss instance on localhost)
Make sure both the signserver directory are owned by jboss.
chown -R jboss.jboss /opt/signserver_<version>
su – jboss
cd /opt/signserver
ant test:run
A report is generated in /opt/signserver/tmp/bin/junit/reports/html/index.html
Run
the test-client to see that everything is up.
cd
dist-client
java -jar timeStampClient.jar
“http://localhost:8080/signserver/tsa?signerId=1”
The
message “TimeStampRequest Validated” should appear once
a second.
Also check JBOSS_HOME/server/default/log/server.log
that successful messages appear.
More information about the signserver can be found at:
SignServer.org, http://www.signserver.org